Det blir ofte igjen papirrester etter små og store prosjekter. Noen ganger er det vanskelig å vite hva man skal bruke disse restene på. Restene kan feks brukes til å lage blomster. Vi har alltid behov for mye blomster på papirprosjektene våre.
It is often left over paper from larger and smaller paper projects. Sometimes, it is difficult to figure out, what to do with the left overs. You may use them to create flowers.
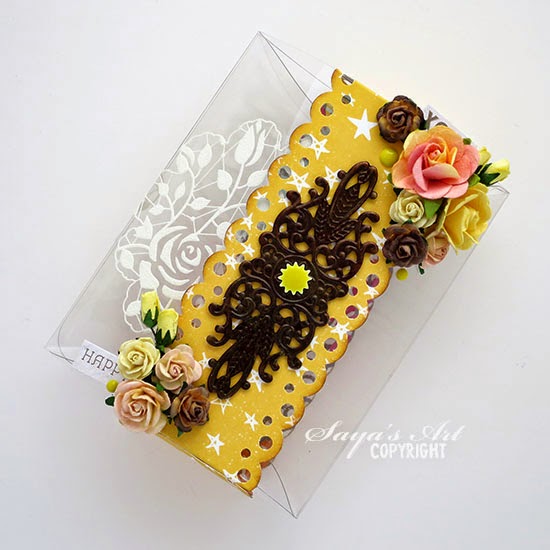
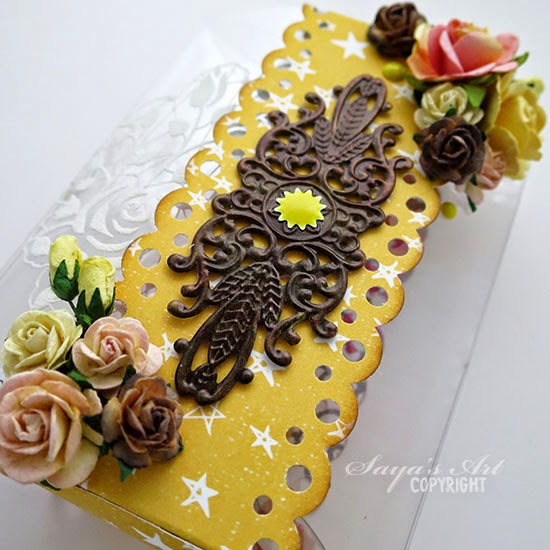
Her er det laget et lite antall blomster i ulik størrelse.
Here is a few hand made flowers in different sizes.
Det er brukt en av blomster diesene til Tim Holtz "Movers and shapers" and et sett med små Nellie Snellen preger og puncher.
To create these flowers, I have used Tim Holtz "Movers and shapers" and a set of Nellie Snellen's punch and embossing flowers.
Enkle roser - Simple roses
Små roser kan lages med ulike blomsterpunchere eller diecuts. Enten kan man bruke bare en størrelse eller man kan sette sammen ulike blomsterstørrelser, med de minste diecuttene innerst i midten av blomsten.
Small roses can be made with different flower punches and diecuts. You may use one kind of diecut flower, or you may use different sizes of diecut flowers. If you choose to use different sizes, you use the smallest flowers in the centre and the largest ones at the outer edge.
Her er det startet med en liten diecut.
Start with a flower diecut.
Knoppen: Denne blomsten skal limes motsatt vei av resten blomsten. Den fargen du vil ha på rosen skal ned mot underlaget. Du skal lime knoppen sammen på den delen av arket som nesten ikke skal synes. To kronblader på motstående sider er limt inn mot hverandre med limpistol. Etter dette er de andre kronbladene limt inntil de to i midten.
Flower bud: The middle of the flower had to be glued the opposite way to the other diecuts for the flower. Leave the side of the paper that you want to show down, and glue the middle of the flower together on the part of the paper that you don't want to show. Find to petals that are opposite to each other, and glue them together with a glue gun.
Det er nå dannet en liten knopp. Vil du kun ha knopper, så kan du stoppe her. En liten grønn stjernediecut (feks fra en punch eller dies) gjør seg da i underkant av knoppen.
You have now created a small flower bud. If you would like to keep it as a bud, you may stop here. Use a small green star die cut under the flower bud.
Dersom du vil lage en rose, limer du i underkant av knoppen, med limpistolen, og fester en ny blomster diecut i underkant.
If you would like to make a rose, glue a new flower diecut under the bud, with a glue gun.
Fortsett å lime blomsterdiecuts under hverandre til du er fornøyd med tettheten på rosen. Pass på at kronbladene overlapper hverandre i de forskjellige lagene med blomster diecuts. Bøy bladene forsiktig opp.
Go on to glue the die cuts of flowers under the flower, until you have the flower density that you want. Make sure the petals in the different layers overlap. Bend the petals into shape.
Ferdige små roser. Disse er satt sammen av knopp + 2 blomster diecuts.
Finished roses. These are made with a flower bud and two flower die cuts.
Sammensatt rose - Rose with different sizes flower die cut.
Her er det brukt en liten rose som er laget over. Denne rosen er limt i midten av to lag med større blomster diecuts. Pass på at kronbladene i de ulike lagene overlapper hverandre. Bruk limpistol.
Use the small flower created above. Glue the flower into the middle of two layers of a larger flower die cut. make sure the petals overlap each other. Use a glue gun.
Kronbladene er formet ved å bruke strikkepinne.
Fold the petals, using a knitting needle.
Andre typer blomster - A different kind of flower
Du får også kjøpt "perler på snor" som kan brukes i midten av blomsten. Bruk en diecut av en liten blomst. Stikk hull i midten av blomsten og tre snoren gjennom hullet, ovenfra og ned.
You can get "Bead Berries" from the shop. These can be used in the middle of flowers. Use a diecut from a small flower. Make a hole in the middle of the flower and pull the strings through - from the top of the flower.
Du har nå stilk, blomst og perler i midten av blomsten. Lim stilken på plass under blomsten med limpistol.
You have a flower stem, flower, and beads in the middle of the flower. Glue the stem in place under the flower with a glue gun.
Stikk hull i flere blomster diecuts og stikk "stilken gjennom hullene, ovenfra og ned.
Make a hole in the other flowers and put the stem trough the holes.
Lim fast tråden bak blomsten, gjerne ved å lime en liten runding eller blomster diecuts i bakkant av blomsten du lager.
Glue the stem behind the flower, use a small paper circle or flower diecut, and glue it under your flower.
Form kronbladene med en strikkepinne.
Fold the petals, using a knitting needle.
Wishing you a happy spring